Happy Photo Friday! Can't remember the name of this church off the top of my head - it's somewhere off of Wilshire Blvd and Western, in Los Angeles. I really enjoy shooting urban photography with my 12-24mm wide angle lens - since it's not necessarily a top of the line lens (Sigma) it gets some distortion and vignetting (which I actually kind of like). Click through the photo for more details on Flickr.
Have a great weekend!
--Paul
Friday, March 19, 2010

Friday, March 12, 2010
F-Line Street Car
Happy Photo Friday everyone. This is a shot of an F-Line streetcar from my last trip to San Francisco. Click through the photo for more. Have a great weekend!
--Paul

--Paul
Saturday, February 20, 2010
Photo Friday!
Well, I'm trying to get back to keeping up with Photo Fridays more regularly, even though I've been working 70 hour weeks lately. At least photography relaxes me and takes my mind off the office a little bit.
Click through the photo to read more on Flickr. Enjoy and have a great weekend!
--Paul

Click through the photo to read more on Flickr. Enjoy and have a great weekend!
--Paul
Saturday, August 15, 2009
Agency Head Shots

Recently I was asked by my boss to take some headshots of the staff. He has a vision in mind - showing "the face of the agency" in a creative way. So the gimmick was to strike a creative pose holding some sort of stuffed animal or toy.
I've been looking to get more people in my portfolio, and I need all the practice I can get with lighting. So I jumped at the chance. Using my co-workers as guinea pigs actually works out pretty good. They can't get too mad at me for anything, because we still have to work together the next day.
Nikon has the Creative Lighting System (CLS), where your camera body talks to multiple off-camera flashes wirelessly using infra-red. The on-camera flash is the "Commander" - telling the off-camera flashes what to do. It syncs the flashes to go at the same time, and allows you to control the intensity, using TTL (Through-The-Lens light metering). The camera measures the light through the lens and factors in the shutter speed, the aperture, the ISO - then calculates everything to tell the flashes what to do. In the camera's menu you can select which flashes should fire more or less brightly. A very powerful system, which takes some getting used to, but can really open up new creative avenues. Check out this DVD for all the nerdly details.
In the "let's be creative" spirit of the shoot, I used strong side-lighting rather than a more than a more traditional portrait approach. It added some nice highlights and accents, for a more interesting shot. I used one white shoot-through umbrella and one bounce-umbrella. The third flash was positioned low, and used a snoot to focus the beam. The white-umbrella was the main light. The bounce-umbrella was there to help control shadows on the opposite side. And the back-glow light helped control shadows on the wall.
Since the flashes only pop when you click the shutter, it takes a little bit of testing to get the lighting just right before you start. So a stand-in is needed to do some testing (interns, get over here!).
The next trick is getting your subject to give you a natural smile. Another reason using co-workers works well. You can gather everyone around and the group dynamic helps get some good laughs. Then, just click-click-click until you get some good takes. Here's how they came out:

www.paulsearsphotography.com
Follow Paul Sears Photography on Twitter, or check out more Paul Sears Photography pages on MySpace, Facebook, or Flickr
Monday, July 13, 2009
Setting Up A Home Photo Studio
I just finished my first venture into food photography, as part of the Strobist Boot Camp assignments.

I shot my entries in my home studio. So I thought it would be interesting to write about what goes into getting a studio set up.
Most people probably think of me as a "nature guy" mostly. But, I am starting to branch out more. Product, people, food, etc. We moved recently, and we got a 2-bedroom specifically with the intent of setting up a home studio in the 2nd bedroom. It's definitely great to have an extra room dedicated to photography. But really, this same setup could work anywhere there is a little extra space.
At any rate, here's a brief list of what anyone looking to set up a home studio will need:
- Space: At a minimum, enough for a background, a table and a tripod. Depending on the lens you want to use, you may need more or less space. In a small space, a good wider-angle lens can help you work closer to your subject. If you have more space, a longer lens can be used. Or if you're doing macro or like small product to sell on Ebay or Etsy, there are complete studio-in-a-box kits such as this one. However, you will probably need additional lighting (see below).
- A Table: If you want to shoot product, food, etc. However, if portraits or head shots are your thing, then maybe you just need a stool for your subject to sit on.
- Background(s): Bigger camera stores, such as Samy's Camera, sell and rent backgrounds. Since styles change all the time, I recommend keeping it simple. Buy a roll of white seamless and a roll of black or gray seamless. A 4.5 foot-wide roll is in the $30-$40 range and lasts a long time if you take care of it. Then, if you're doing a portrait shoot and you need a more stylish, textured muslin background, just rent it (because they sell for $100 and up). That way you're not getting locked into a style that may go obsolete before you break even.
- Background Support: Something has to hold up the roll, right? A couple of different ways to approach this. At my old place, I mounted brackets on the wall, ran a big dowel through the middle of the roll, and hung it up that way. At my new place, I wanted a more flexible approach, so I bought a Portable Background Stand. Basically two light stands with a variable-length crossbar, so you can change the height and width, as well as disassemble the whole thing and take it with you anytime. About $150-$200, or there are certainly higher-end options as well (ones that let you hang more than one roll at a time).
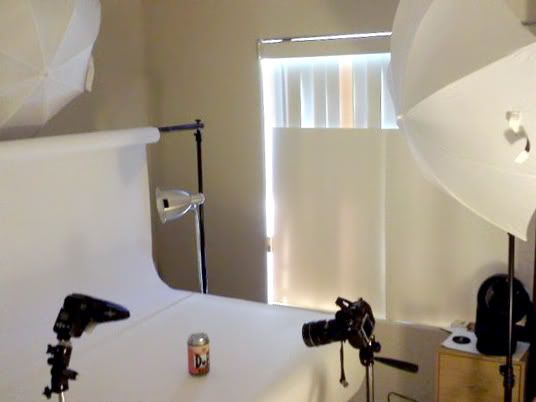
- Lighting: When I first started shooting studio-style about a year ago, I was surprised by how much light was needed to get a good shot. Way more light needed than I had anticipated when I first got started. But it doesn't have to break the bank. You can see from the shot above, I use a combination of lighting. I use a mix of static (always-on) lighting, as well as Strobes (aka Speedlights) (aka off-camera flashes). For the static lighting, it's just two cheap floor lamps from IKEA with 150 watt CFL light bulbs. The "Blue" CFL bulbs (called day-glow or something like that) give off a similar color of light as the flashes. There is an awesome blog called Strobist dedicated to using flashes - I highly recommend checking out the Lighting 101 section if you are just getting started.
- Lighting Support: Again, something has to hold up the lighting right? Light Stands can be picked up at just about any camera store. I found some light-duty stands for about $35 each at Samy's Camera. Perfect for in-home use, and they have a very small "footprint" in terms of taking up floor space. Heavier-duty light stands can be $75 and up. But if you plan to take them outdoors or need additional height or load-bearing strength, it may be worth it.
- Diffusers: A flash or a 150-watt CFL by themselves are very harsh and will lead to a lot of nasty shadows. In the picture above, you can see I use a combination of things. Shoot-through umbrellas are available at many camera stores, and help soften the light of a flash. I also use "diffusion domes," which are inexpensive white plastic caps for the end of a flash, which helps soften the light. The flash in the lower-left corner of the picture above has a "snoot," which focuses the light into a tight beam. For all of this stuff - definitely check out Lighting 101 on Strobist - very helpful!
- A Tripod: Of course. I mean, I suppose you could try to shoot hand-held in the studio. But let's say you get that shot exactly how you want it, except your exposure was just a hair off and you need to do another click. If you're shooting hand-held, good luck getting the exact same composition again. On a tripod, it's guaranteed to be the exact same composition you just had. Just tweak a couple of settings and click. Because in the studio, composition is an arduous process, a tripod is (in my opinion) an absolute must.
That's about everything I think. No doubt, it's a long list of stuff. And honestly, it took me months to build it all up. But the great thing about all this gear is it's designed to last a very long time if you take care of it. So with every piece you pick-up, your studio just gets better and better.
www.paulsearsphotography.com
Or check out more Paul Sears Photography pages on MySpace, Facebook, or Flickr
I shot my entries in my home studio. So I thought it would be interesting to write about what goes into getting a studio set up.
Most people probably think of me as a "nature guy" mostly. But, I am starting to branch out more. Product, people, food, etc. We moved recently, and we got a 2-bedroom specifically with the intent of setting up a home studio in the 2nd bedroom. It's definitely great to have an extra room dedicated to photography. But really, this same setup could work anywhere there is a little extra space.
At any rate, here's a brief list of what anyone looking to set up a home studio will need:
- Space: At a minimum, enough for a background, a table and a tripod. Depending on the lens you want to use, you may need more or less space. In a small space, a good wider-angle lens can help you work closer to your subject. If you have more space, a longer lens can be used. Or if you're doing macro or like small product to sell on Ebay or Etsy, there are complete studio-in-a-box kits such as this one. However, you will probably need additional lighting (see below).
- A Table: If you want to shoot product, food, etc. However, if portraits or head shots are your thing, then maybe you just need a stool for your subject to sit on.
- Background(s): Bigger camera stores, such as Samy's Camera, sell and rent backgrounds. Since styles change all the time, I recommend keeping it simple. Buy a roll of white seamless and a roll of black or gray seamless. A 4.5 foot-wide roll is in the $30-$40 range and lasts a long time if you take care of it. Then, if you're doing a portrait shoot and you need a more stylish, textured muslin background, just rent it (because they sell for $100 and up). That way you're not getting locked into a style that may go obsolete before you break even.
- Background Support: Something has to hold up the roll, right? A couple of different ways to approach this. At my old place, I mounted brackets on the wall, ran a big dowel through the middle of the roll, and hung it up that way. At my new place, I wanted a more flexible approach, so I bought a Portable Background Stand. Basically two light stands with a variable-length crossbar, so you can change the height and width, as well as disassemble the whole thing and take it with you anytime. About $150-$200, or there are certainly higher-end options as well (ones that let you hang more than one roll at a time).
- Lighting: When I first started shooting studio-style about a year ago, I was surprised by how much light was needed to get a good shot. Way more light needed than I had anticipated when I first got started. But it doesn't have to break the bank. You can see from the shot above, I use a combination of lighting. I use a mix of static (always-on) lighting, as well as Strobes (aka Speedlights) (aka off-camera flashes). For the static lighting, it's just two cheap floor lamps from IKEA with 150 watt CFL light bulbs. The "Blue" CFL bulbs (called day-glow or something like that) give off a similar color of light as the flashes. There is an awesome blog called Strobist dedicated to using flashes - I highly recommend checking out the Lighting 101 section if you are just getting started.
- Lighting Support: Again, something has to hold up the lighting right? Light Stands can be picked up at just about any camera store. I found some light-duty stands for about $35 each at Samy's Camera. Perfect for in-home use, and they have a very small "footprint" in terms of taking up floor space. Heavier-duty light stands can be $75 and up. But if you plan to take them outdoors or need additional height or load-bearing strength, it may be worth it.
- Diffusers: A flash or a 150-watt CFL by themselves are very harsh and will lead to a lot of nasty shadows. In the picture above, you can see I use a combination of things. Shoot-through umbrellas are available at many camera stores, and help soften the light of a flash. I also use "diffusion domes," which are inexpensive white plastic caps for the end of a flash, which helps soften the light. The flash in the lower-left corner of the picture above has a "snoot," which focuses the light into a tight beam. For all of this stuff - definitely check out Lighting 101 on Strobist - very helpful!
- A Tripod: Of course. I mean, I suppose you could try to shoot hand-held in the studio. But let's say you get that shot exactly how you want it, except your exposure was just a hair off and you need to do another click. If you're shooting hand-held, good luck getting the exact same composition again. On a tripod, it's guaranteed to be the exact same composition you just had. Just tweak a couple of settings and click. Because in the studio, composition is an arduous process, a tripod is (in my opinion) an absolute must.
That's about everything I think. No doubt, it's a long list of stuff. And honestly, it took me months to build it all up. But the great thing about all this gear is it's designed to last a very long time if you take care of it. So with every piece you pick-up, your studio just gets better and better.
www.paulsearsphotography.com
Or check out more Paul Sears Photography pages on MySpace, Facebook, or Flickr
Tuesday, June 30, 2009
July Facebook Fan Giveaway
Thanks everyone for being fans of Paul Sears Photography on Facebook! I wanted to try a fun giveaway to say thanks for being part of the community and helping me spread the word. If it goes OK, I’ll definitely do more in the future.
So here goes….
This July, one lucky fan will win a free 11x14 Matted Print of their choosing. The contest is open to anyone who is a Paul Sears Photography Facebook Fan, regardless of when you became a fan.
It’s super easy to enter. Just help me spread the word by hitting the “Share” button, which will post the Paul Sears Photography Facebook Page to your news feed. Then write on the Paul Sears Photography Facebook Page's Wall to let me know you’ve “shared." Note: letting me know on the Wall is pretty much the only way I would know you did it, plus making it public keeps it fair for everyone.
All month long, I’ll keep track of everyone who posts on the Wall to let me know they've shared the Page. Then on 8/1/09 I’ll do a random drawing to select a winner. The drawing will be done as a YouTube video (so you know it's legit, right?). I'll post the video on the Page Monday 8/3/09, so everyone can see who won. The winner gets a free 11x14 Matted Print of their choosing, free shipping, totally free.
Even better – if you share two times during the month, just write on the Wall both times, and you’ll have two entries. Three shares, three Wall posts, three entries, and so on. Up to 5 entries max per person. Just remember to let me know on the Wall, so I can count your share toward the contest. And please, play nice. And don’t try to fake me out; that’s not cool.
The winner can chose any image on www.paulsearsphotography.com that is available as a “16x20 Mat with 11x14 Print” or "20x16 Mat with 14x11 Print" as of 8/1/09. The “Buy This Item” link next to any image shows which sizes are available for that image. The 11x14 Print will be professionally matted with a 16x20 white acid-free gallery mat, and assembled with 100% acid free archival materials. In other words, designed to last a lifetime. More info on sizes is also available on the Print Sizes and Matting Options pages of the site.
Please feel free to give me a shout with any questions. Thanks again for your support!
--Paul
Wednesday, June 24, 2009
Another Totally Unbiased Review - AF-S NIKKOR 24-70mm f/2.8G ED
I know, I know... I need to blog more often. But jeez louise, between Twitter, Facebook, Myspace, Flickr and lord only knows what else, it's hard to keep up! Let alone actually getting out to go shoot once in a while...
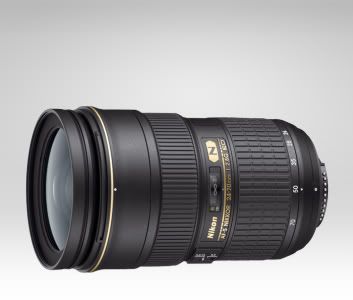
BUT - I digress. I want to post yet another totally unbiased review on a recently acquired piece of Nikon Gear. The AF-S NIKKOR 24-70mm f/2.8G ED.
Needless to say the Samy's Camera rep's eyes lit up when I walked in asking for a D700 and this lens. It was short-lived, however, because I'm a tough customer and a good negotiator. I left smiling, and the poor rep probably got in trouble with his boss....
OK, about the lens. Bottom line, this is by far the most expensive lens I've ever owned. But it is by far the best. When I was shopping and reading reviews, I almost went for the less expensive AF-S DX Zoom-NIKKOR 18-70mm f/3.5-4.5G IF-ED. However, after reading lengthy reviews on Ken Rockwell suggesting it might not be worth the $900 pricetag, I had only one choice left. Go big or go home.
This lens is amazingly sharp at any focal length and any aperture. Color is exceptional, especially coupled with the D700. It produces a beautiful creamy bokeh when shooting wide open at f/2.8, and it also has a nice medium aperture at 5.6-8. It stops all the way down to f/22. The construction is extremely rugged - large and weighty. Impresses your friends, but also lets you know you can count on it for the long haul. At the same time, it's small and light enough to carry around the city or on a hike. (I don't recommend bringing it to a party however, unless you really want to feel like papparazzi the whole time).
Technically speaking, this lens is best in class of what Nikon has on the market now. The large "N" symbol on the outside of the lens refers to Nikon's Nano Crystal Coat process, on an internal glass element, which helps cut down on lens flare and ghosting. Two Extra-low Dispersion (ED) elements and PGM aspherical lenses control chromatic aberrations while enhancing sharpness and contrast. And this has to be the quietest SWM auto-focus motor I've ever seen.
Any gripes? Yes. A couple minor ones. 1) The hood for this lens is SO big that I never use it. But, pretty minimal lens flare so far, shooting without the hood. 2) You do get a small amount of vignetting at 24mm, using a screw-on filter. So I just keep it in mind when composing, and crop it off after. Easy.
Overall, 9 thumbs up for this lens. Between this lens and the D700 body, my confidence in the field has dramatically increased. Well worth the price.
www.paulsearsphotography.com
Follow Paul Sears Photography on Twitter.
Or check out more Paul Sears Photography pages on MySpace, Facebook, or Flickr.
Wednesday, May 27, 2009
Nikon Lenses - FX vs. DX
Nikon makes two categories of lenses for DSLRs - FX format and DX format.
The lens format is tied to the sensor format in the camera body. The FX sensor is full-frame, meaning the sensor itself is physically the same size as a frame of 35mm film (36mm wide x 23.9mm high). The FX sensor is built into the D3, D3X, and D700. The DX sensor is smaller in size (23.6mm wide x 15.8mm high), and comes in the smaller DSLR's: D300, D90, D80, D70, D60, D40.
The image coming through the lens must fit precisely onto the sensor, so that what you see in the viewfinder directly translates to what you see in the photo. Thus, the FX lenses are designed to project a larger image onto the larger FX sensor, while the DX lenses project a smaller image onto the smaller DX sensor. The glass is different so that the image you see in the viewfinder is configured larger or smaller when it hits the camera body. Probably the easiest way to tell an FX lens from a DX lens (aside from the fact it's labeled on the lens) is to turn the lens around and look at the rear element of the lens; the FX has larger glass in the rear, while the DX has smaller glass in the rear.
Nikon does offer flexibility, however. If you use an FX camera such as the D3, D3X, or D700 you can still use both FX and DX lenses. If you use an FX lens, you get the full-frame image at the full resolution the camera offers. If you use a DX lens, the camera will automatically crop the image to account for the smaller image being projected onto the sensor. You also get a reduction in resolution. This is because the image being projected onto the sensor from the lens, is actually smaller than the sensor itself. Basically the camera adjusts for the fact that the outer edges of the sensor are not receiving any light/image from the lens. Net takeaway - if you have an FX camera, you can use both types, but you lose resolution with a DX. So it makes more sense to use an FX lens.
On the other hand, if you're using one of the DX format cameras listed above, you can also use both FX and DX lenses, but with different results. If you use a DX lens, the image will be normal - normal size and normal resolution. If you use an FX lens, you still get the image you see in your viewfinder, but the focal length of the lens is magnified by 1.5x. So if you set the lens to 100mm, your image is actually 150mm focal distance. You will still get the exact image you see in the viewfinder, because the magnification happens through the lens, and thus through the viewfinder. This actually is a good thing, if you're hoping to extend your range for wildlife or sports. But it can be a bad thing, if you're trying to shoot wide-angle. For example, an 18mm focal length would effectively become 27mm because of the magnification factor. Bottom line - for a DX camera, you can use either format at full resolution. An FX lens helps with longer shots due to the magnification, but can hurt when it comes to wide-angle.
Perhaps the best comparison/explanation I've ever seen is embedded below. Big props to Lilkiwiguy87 for taking the time and trouble to put this together. While I can't necessarily vouch for the musical selection, I must say the video was very helpful as I was researching between the D300 vs. D700, and accompanying lenses.
www.paulsearsphotography.com
Or check out more Paul Sears Photography pages on MySpace, Facebook, or Flickr
Thursday, May 14, 2009
Nikon D700 - Totally Unbiased Review
I have finally upgraded to a "real" pro level camera body. The Nikon D700.

So, how's it going so far?
Well, I've been on two multi-day shooting trips, and shot a friend's band at a local gig, with the D700 since I got it. And to be perfectly honest, after a couple thousand clicks, I have to say...I just don't know if there are words to express how I feel about this camera.
I mean, I could use the word LOVE, but it would be a ridiculous understatement. Maybe if I wrote LOVE in a giant font it might come close. This camera is fantastic. Beyond fantastic. I've never been happier.
OK, I better leave it at that, just in case the Mrs. reads this. At least for now, the D700 still sleeps on the couch.
When I was shopping, I was considering the D300, which runs about $1500-$2000 for the body. However, once I started looking closer at the D700, the choice became clear. The D700 is a little more, priced at about $2500-$3000. I pulled out the ol' haggling tactics and actually got mine for less, at Samy's Camera here in Culver City, CA.
Yes it's more, but what you get for that increase is well worth the price:
- 12.1 Mgpx FX Full-Frame CMOS sensor (same sensor as the D3)
- EXPEED 14-bit RAW processing (same processor as the D3)
- ISO up to 25,600 (same as the D3)
- 3" 920,000 dot VGA color monitor (same as the D3)
- 51-point AF matrix (same as the D3)
- Active D-Lighting, Sensor Cleaning, 5+fps (same as the D3)
Do I sound like a broken record yet? Intentionally so....this camera is basically 80% (or more) of the D3 for like 50% of the price. And in some areas, it actually outperforms the D3.
Let me break it down this way. Here are a few reasons why I'm head over heels in love:
 |  |
 |  |
 |  |
Monday, March 2, 2009
Nikkor 70-300mm VR AF-S f/4.5-5.6G IF-ED
Yes, I know, that's a lot of acronyms. And I'll admit I've typed them all out any number of times since this past Friday, when I picked up this awesome new lens. Well worth the price, it replaces/upgrades my 55-200mm less which was part of the kit when I first bought my D80. Let me say again, this lens is awesome!
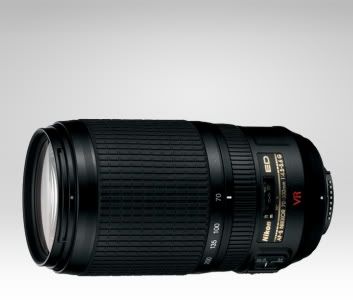
First of all, it reaches 300mm (compared to 200mm I had before). Second, it's an FX-format lens, so it will work with the D700 camera body I'm planning to purchase soon. Third, it's so much more robust than the 55-200 lens - not just bigger/heavier, but better quality optics and better VR (Vibration Reduction). And of course, because I'm still shooting with a D80 (which is DX format), I actually get a magnification factor of 1.5x. Meaning its max reach is effectively 450mm.
But that's not all. Until now, for long shots like ball games or wildlife, I was shooting 200mm with a 2x teleconverter (aka the poor man's telephoto). But the downside of the teleconverter outweighed the extra reach. 1) You lose 2 stops worth of light. 2) You can't use AF, so you're trying to eyeball precise focus on something a hundred yards away. I can't even count the number of images I've discarded due to softness around the edges, because I was off by less than 1-degree on the manual focus ring.
Alas! No more! My reach is effectively increased, with no loss of light, better optics, and the ability to use AF. Baseball Spring Training here I come!
And last but not least, for the acronym nerds among us, here's the breakdown:
- 70-300mm = Focal Range of the Lens
- VR = Vibration Reduction
- AF-S = Autofocus w/ Silent Wave Motor
- f/4.5-5.6 = The Lens' Maximum Aperture (Variable)
- G = Aperture Settings Controlled Internally
- IF = Internal Focusing
- ED = Extra Low Dispersion Glass
For more on what any of this gobbledygook actually MEANS, read more here.
www.paulsearsphotography.com
Or check out more Paul Sears Photography pages on MySpace, Facebook, or Flickr
Subscribe to:
Posts (Atom)