Sunday, January 11, 2009

Nikon D90

I came across an article recently in PDN about Nikon's new D90.


For quite awhile, I've been looking at the D300 as an upgrade to a 12.3 MP body. But now the D90 could be a contender. Price of course is a major difference between the two. The D300 is a pro camera, while the D90 is a consumer model at about half the price.

However one major difference (as you may have seen in the Ashton Kutcher TV spot) the D90 is the first DSLR camera to shoot 720p HD Video. Video in a DSLR...interesting. Could be a lot of fun at ball games. Certainly something to think about...

Similarities
- Both the D300 and the D90 have a 12.3MP CMOS sensor.
- Both the D300 and the D90 have a 3" 920,000px color screen.
- Both feature Nikon's noise reduction up to ISO 3,200.
- Both have Nikon's D-Lighting image enhancement feature.
- Both have built-in sensor cleaning.


Differences
- The D300 is considered a pro-level camera ($1,799 MSRP).
- The D90 is a consumer model ($999 MSRP).
- The D300 has a 51-point AF system.
- The D90 uses an 11-point AF matrix.
- The D300 shoots 6 frames per second.
- The D90 shoots 4.5fps.
- The D300 is a still-photo camera only.
- The D90 is a still camera but also shoots video.

www.paulsearsphotography.com

Or check out more Paul Sears Photography pages on MySpace, Facebook, or Flickr

Monday, January 5, 2009

Shooting in Early Morning

This past Sunday (when the sun finally came out again in LA), I woke up early and headed up the coast about an hour to La Piedra Beach just north of Malibu. I've been wanting to try and catch the early morning light up there for a while. It was well worth leaving the house around 6:30am. The long light just after sunrise was perfect, providing warm highlights and fantastic directional lighting on the rock formations and wildlife.

The photo gurus always say, if you're going to use natural light, then shoot just after sunrise or just before sunset. They're right. Compared to shooting mid-day when the light is harsh and overwhelming, the subtle angled light of early morning is wonderful. On the three shots below, notice how the directional lighting provides dramatic contrast and warm highlights.


www.paulsearsphotography.com

Or check out more Paul Sears Photography pages on MySpace, Facebook, or Flickr

Tuesday, December 2, 2008

Nikon D3

Well, since it's Christmas time, I thought why not do a post about my dream camera. The Nikon D3:


Where to begin? 12.1 Megapixels - check. Low noise even at 25,000 ISO - check. Full Frame 35mm Size CMOS Sensor - check. 9 frames per second - check. Cnet Editor's Choice Award - check. American Photo, Camera of the Year - check.

Downside? Other than the pricetag ($5k) I'm struggling to find one.

Santa - are you reading this?

www.paulsearsphotography.com

Or check out more Paul Sears Photography pages on MySpace, Facebook, or Flickr

Monday, November 24, 2008

Using a Polarizing Filter

Ever take a photo on a bright sunny day, only to have the sky wash out and be pale bluish-white? Ever wonder how photographers manage to get that perfect blue sky?


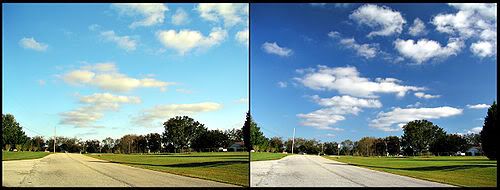
One of the best ways to get the most out of the sky is to use a Polarizing Filter. A Polarizing Filter, or Polarizer, is a filter used to control the contrast and lightness of the sky, reduce glare and atmospheric haze, and increase color saturation. Here's a great example from the Wikipedia article on filters - the image on the right uses a Polarizer, while the image on the left does not:


Yes, these days the effects of a Polarizer can be replicated in photoshop. But why spend the extra time to get a great shot on your computer, when you can get one right out of your camera. Most DSLR's will accept a polarizer, it simply screws onto the business end of your lens. Just know the diameter of your lens in mm (should be marked on the lens itself), and head to your local camera shop. They run in the range of $30-$50, but in my opinion, it's money well-spent for the time it saves in post processing.

The downside? You effectively lose a couple stops worth of light. Also, a polarizer can sometimes make your image a little flat by diminishing highlights too far in certain situations. So it takes a little practice to know when is the best time and place to use your polarizer. Just remember to carry a soft case in your bag, so you can stow your polarizer safely when not in use.

My advice? Spend the $30, practice until you know the best way to use your polarizer, and then enjoy all the time you'll save as well as more beautiful shots!

www.paulsearsphotography.com

Or check out more Paul Sears Photography pages on MySpace, Facebook, or Flickr

Monday, November 17, 2008

Back in Action

Well, it's been quite a while since I've posted anything at all. It's been "that time of year" at my day job. I do advertising for video games, and September/October/November is the busiest time of year. But now, the 14+ hour workdays seem to have passed, at least for the moment. Meaning I'll be able to put a little more time and energy back into photography.

Stay tuned for more to come this week. Meantime, go buy Call of Duty World at War and James Bond Quantum of Solace the game! ;-)

www.paulsearsphotography.com

Or check out more Paul Sears Photography pages on MySpace, Facebook, or Flickr

Wednesday, September 3, 2008

Auto Bracketing

Well, it's been a little while since my last post. We're into the busy season at work - consistent 12-14 hour days are leaving less time for photography (or anything else for that matter). And also I'm suffering from a little bit of Photography Overload coming back from my trip to Chicago (almost 4,000 raw shots to weed through). So I thought I'd do a quick blog about Auto Bracketing - one of the reasons I have so many pics to review.

Bracketing is the practice of shooting 2-3 frames on each shot you're trying to take, with each shot using different settings. The goal is to give yourself more options to choose from on the back end, to help ensure you get the perfect shot while you're out in the field and to help cut down on post processing.

There are a few ways to do bracketing. One way is to bracket the white balance - if you take 3 snaps of the same shot, the first one might be a little more red/warmer, the second might be a little more neutral, and the third might be a little more blue/cooler. Another way would be to bracket your flash - for example the first shot could be full power, the second shot could be 1/2 power, and the third shot could be 1/4 power. What I use most often is exposure bracketing - the first shot is a normal exposure based on the shutter speed and aperture I have selected, the second shot goes a little darker by adjusting shutter speed and/or aperture, and the third shot goes a little lighter.

Which brings us to Auto Bracketing. Many DSLR cameras have this as a standard setting, where you can select the number of frames to be shot in each set (1, 2, or 3), as well as the type of bracketing (white balance, exposure, etc), and the step value between each shot (how different is each shot going to be). I typically set up Auto Bracketing for exposure, 3 frames, with a step value of 0.3 (the lowest step value my D80 will do). That means it will take 3 frames, each about 0.3 stops apart in terms of exposure.

Once you set up Auto Bracketing, here's where the shots really start adding up - using Auto Bracketing in Burst Mode. If you set your camera up to do Auto Bracketing, and then turn on Burst Mode, you can snap 3 frames in about a second. That's what I've been doing a lot more of lately to make sure I get the shot I want - I get 'er all lined up, focus, check the light to help set my shutter speed, aperture and white balance, and then I snap 3 shots with Auto Exposure Bracketing in Burst Mode. Half an hour later, I've got a full memory card.... While it leads to more shot selects to go through on the back end, I will definitely say it has saved me tons of time in post processing because I can select the exposure I like best, rather than having only 1 shot to choose from and having to tweak in photoshop to get it just right. Now on to sorting through the Chicago pics...

www.paulsearsphotography.com

Or check out more Paul Sears Photography pages on MySpace, Facebook, or Flickr

Tuesday, August 19, 2008

Robert Rauschenberg at Bergamot Station, Santa Monica

This past weekend, the Mrs. and I went to check out Bergamot Station for the first time. It's in Santa Monica, about 3-4 miles from where we live in Marina Del Rey. Near the 10 Freeway, kind of over by the Santa Monica airport.

Started the afternoon off with a nice caprese sandwich and a coffee, and then checked out maybe a dozen or so galleries and the Santa Monica Museum of Art. While we saw a lot of really cool stuff, I have to say I was totally blown away by the Greenfield Sacks Gallery, which had a number of pieces from Robert Rauschenberg's "The Lotus Series" (2008).


As you may know, Robert Rauschenberg passed this year. He was one of the preeminent contemporary artists in the world, and was LA-based. His work is heavily featured at LACMA and any number of other museums. So needless to say, to be standing face to face with these pieces, created only a month or so before the artist's death, it was an unbelievable experience. Each piece was selling for $15,000+, and not surprisingly only one piece was yet unsold. I dug through my pockets, and the Mrs. dug through her purse, but unfortunately we just couldn't quite come up with the $15k needed to buy that last remaining piece....lol. Either way, it was really cool to see the collection, and hopefully some of the work will make its way back into a museum someday.


www.paulsearsphotography.com

Or check out more Paul Sears Photography pages on MySpace, Facebook, or Flickr

Thursday, August 14, 2008

Nikon SB-600 Speedlight

On the advice of a good friend and fellow photographer, Don Lupo, I've been spending some time learning more about lighting. Don's point has always been that while my "available light" shots have been pretty good, adding some lighting could really help make them even better. I've been on the fence for a while, because my philosophy has always been to bring less gear and to capture moments "in the raw." All the commercial shoots I've been to, the photographer has so much lighting gear that he/she needs 1 or 2 assistants, a stylist, etc - but for me I want to keep it simple and just shoot.

But I try to tell myself I'm an open minded guy, so going on Don's advice, I've been spending a lot of time lately reading David Hobby's blog - Strobist.com. The Strobist approach is a middle-ground if you will, a way to do professional lighting with "speedlight" standard flash units - not huge studio lights. The more I've been reading, the more interested I've gotten.

So I made the jump - I forked over some moolah (thanks a lot Nikon for making this an expensive hobby...) and picked up a Nikon SB-600 Speedlight as my first strobe.


The SB-600 is Nikon's middle flash unit - the SB-800 (or the new SB-900) is the high end, and the SB-400 is the low end. All of the above work together with Nikon's proprietary lighting software called CLS (Creative Lighting System). The CLS basically allows you to use multiple speedlight flash units and sync them all together with one push of the button on the camera. So instead of needing 4-5 large studio lights, you could use 4-5 flashes instead, and they all flash at just the right moment because of the CLS software. For me, for now - I'm content trying to figure out how to use just one...

The other two things I got at the same time as the flash are the Omni-Bounce Diffuser and the Nikon SJ-1 gel kit.


The diffuser helps a lot to reduce the harshness of the light coming off the flash, instead creating a soft diffused light like what you'd get in the studio. The gels insert right into the flash head, and can help mitigate the greenish effects of fluorescent lighting and the orange-ish effects of incandescent lighting, or provide accent color if needed.

While I haven't had too-too much time to practice yet, I think next week's trip to Chicago will offer ample opportunity to play around with it. Meantime - here's a couple of shots I took down at Venice Beach using the flash + diffuser. By putting lighting on the subject in the foreground, it balanced the brightness between subject and sky - allowing me to shoot a little darker and get a deep blue sky while still being able to see the subject. Overall from 1 day's practice, I'm pretty happy with the results!


Tuesday, August 12, 2008

Tamron 2x Teleconverter In Action

This past weekend, the Mrs. and I went to the Angels vs. Yankees game down in Anaheim so I could test out my new Tamron 2x teleconverter before we head to Wrigley Field for the first time next week. In order to really put it to the test, we decided to sit in the nose-bleediest of nosebleed seats:


It actually worked out pretty good. The hard part is trying to dial-in manual focus at that long of a distance. Also, with a teleconverter you automatically lose 2 stops of aperture so I needed to increase the ISO up to about 400 (even in bright sunlight) to ensure I could run a fast shutter speed. 1/500 is usually minimum for sports. The good news is the teleconverter worked just fine in burst mode, so I was able to snap about 3-4 frames per second even at extreme zoom. You definitely need burst mode to get those "magic moments" at a ballgame. Higher-end pro cameras will shoot as fast as 6-9 frames per second.

Overall, a little more practice needed, but for a first attempt and considering how far away our seats were, I'm pretty happy with the results.


Tuesday, August 5, 2008

2008 Los Angeles Juried Exhibition - Opening Reception

This past Sunday was the opening reception for the 2008 Los Angeles Juried Exhibition at the Los Angeles Municipal Art Gallery in Hollywood. It was a really fun day! Luckily we got there early enough to get parking, because as with most of LA, parking was at a premium. Basically the gallery is on top of a huge hill, and any latecomers had to park all the way at the bottom and walk up.

The opening was pretty well attended, and was a lot of fun. The gallery provided the requisite wine, fruit and cheese. There were a couple of bands, and 92 really cool pieces to check out - painting, photography, scuplture, video, and a couple of large installations. The exhibition will remain up through September 7 - so if you're in the neighborhood, feel free to stop by any time:

Los Angeles Municipal Art Gallery
Barnsdall Park: 4800 Hollywood Blvd
Los Angeles, CA 90027


www.paulsearsphotography.com

Or check out more Paul Sears Photography pages on MySpace, Facebook, or Flickr